欢迎光临
我们一直在努力

阿里云GPU服务器配置深度学习环境-远程访问-centos,cuda,cudnn,tensorflow,keras,jupyter notebook

阿里云GPU服务器配置深度学习环境-远程访问-centos,cuda,cudnn,tensorflow,keras,jupyter notebook

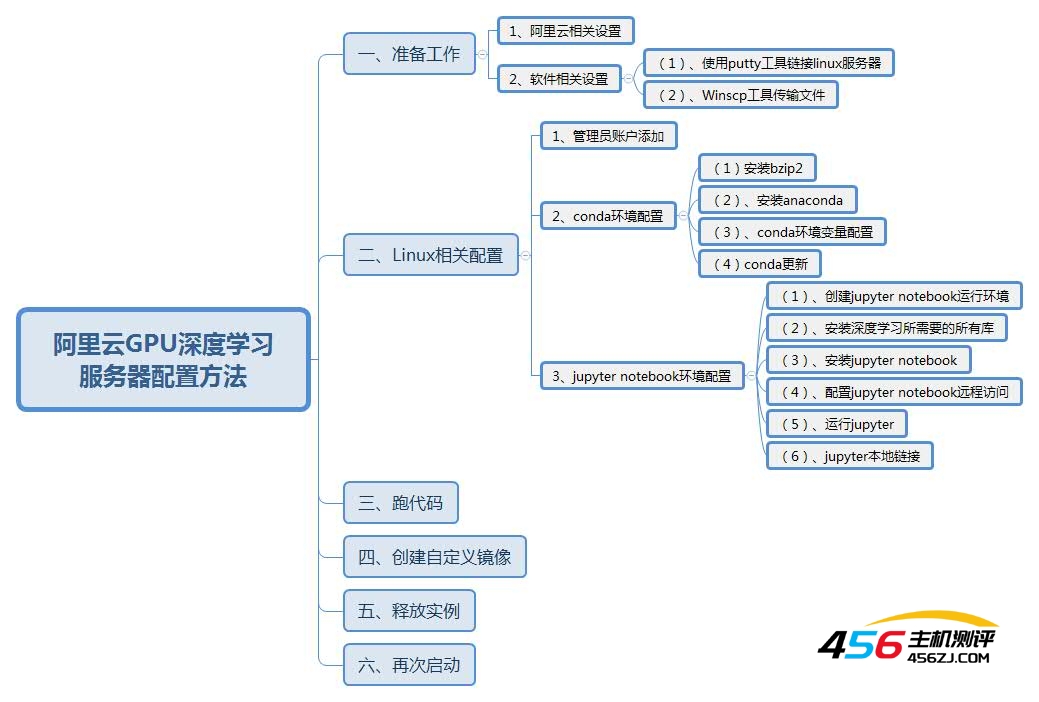
一、准备工作:

1、阿里云相关设置:

先给阿里云账户充值100元。
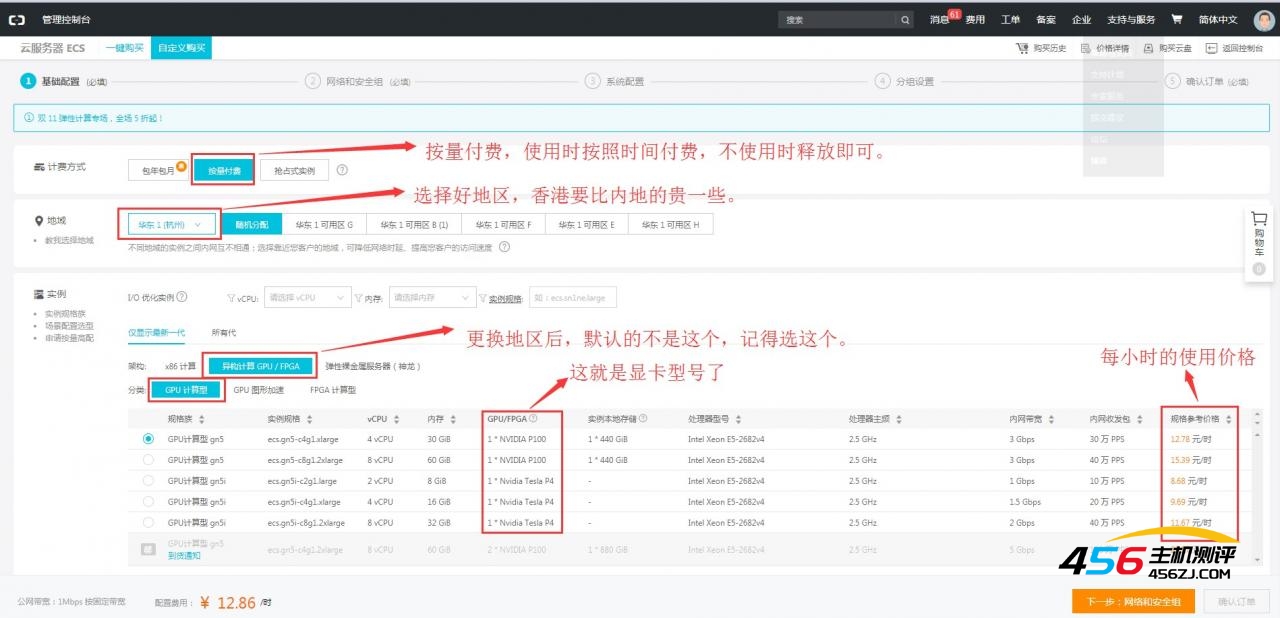
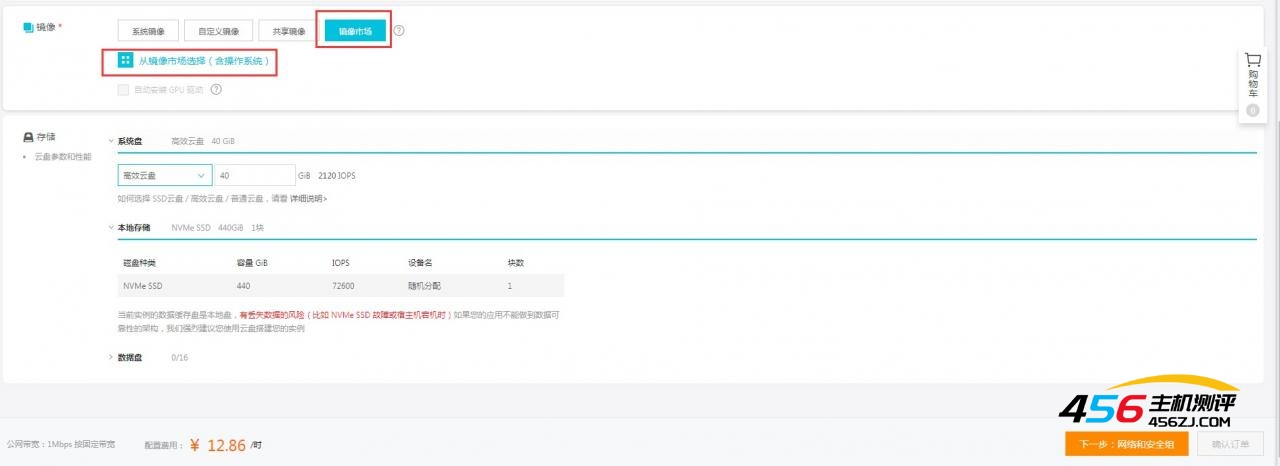
选择阿里云EcS服务

阿里云GPU服务器配置深度学习环境-远程访问-centos,cuda,cudnn,tensorflow,keras,jupyter notebook

阿里云GPU服务器配置深度学习环境-远程访问-centos,cuda,cudnn,tensorflow,keras,jupyter notebook

阿里云GPU服务器配置深度学习环境-远程访问-centos,cuda,cudnn,tensorflow,keras,jupyter notebook


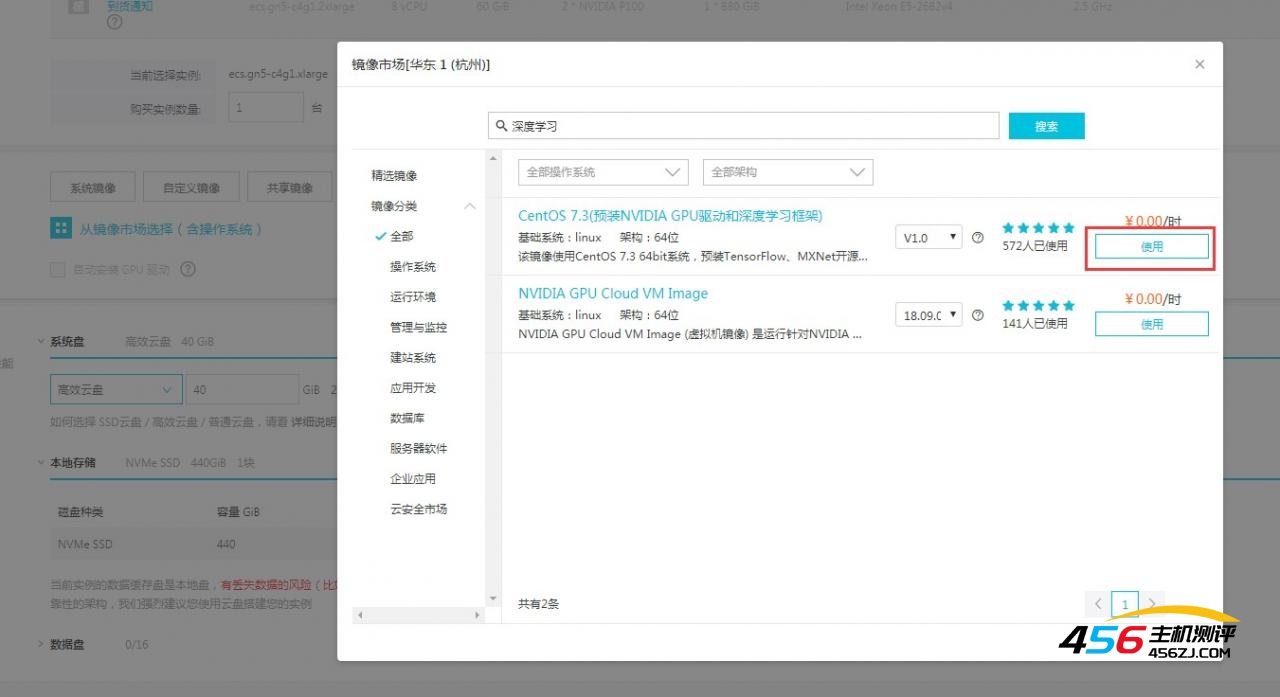
搜索:CentOS 7.3(预装NVIDIA gPU驱动和深度学习框架)


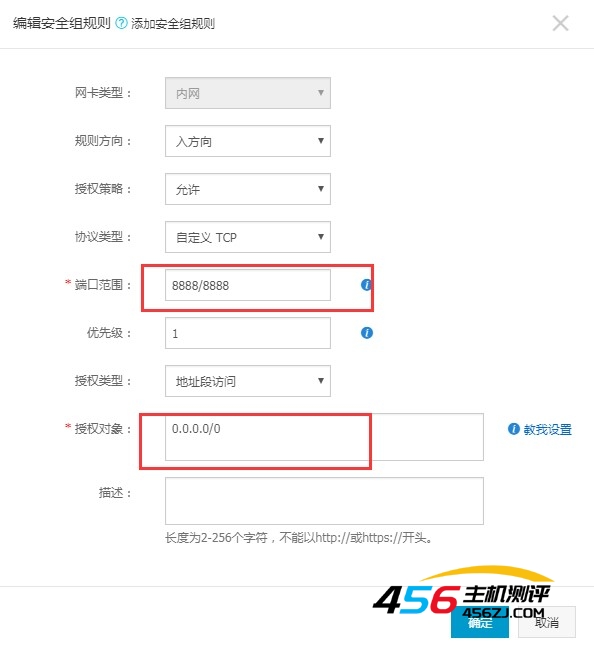
安全组添加8888权限

8888/8888

0.0.0.0/0
阿里云GPU服务器配置深度学习环境-远程访问-centos,cuda,cudnn,tensorflow,keras,jupyter notebook


2、软件相关设置:

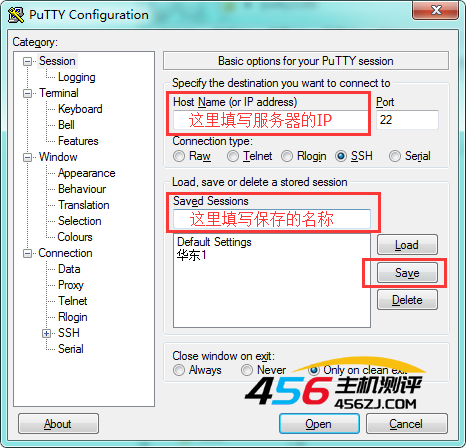
1)、使用putty工具链接linux服务器

阿里云GPU服务器配置深度学习环境-远程访问-centos,cuda,cudnn,tensorflow,keras,jupyter notebook

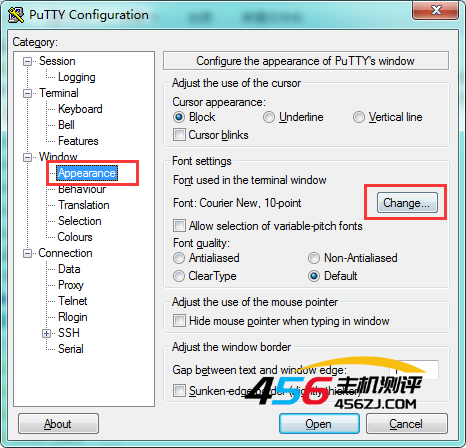
小字体看的眼晕的话,这里可以改字体,16-18号看起来就可以很舒服了

阿里云GPU服务器配置深度学习环境-远程访问-centos,cuda,cudnn,tensorflow,keras,jupyter notebook

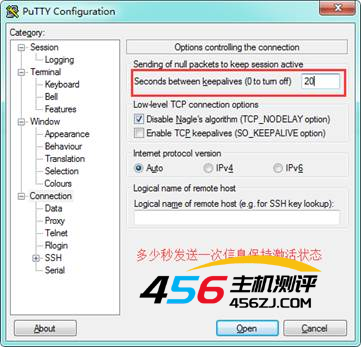
这里是坑,绝对不要填0,保持激活状态

 阿里云GPU服务器配置深度学习环境-远程访问-centos,cuda,cudnn,tensorflow,keras,jupyter notebook

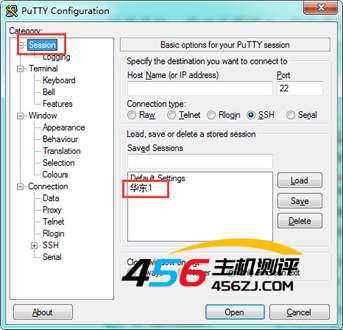
回到这里,双击刚才保存好的链接信息

阿里云GPU服务器配置深度学习环境-远程访问-centos,cuda,cudnn,tensorflow,keras,jupyter notebook


PS:putty终端操作linux鼠标右键是粘贴功能。


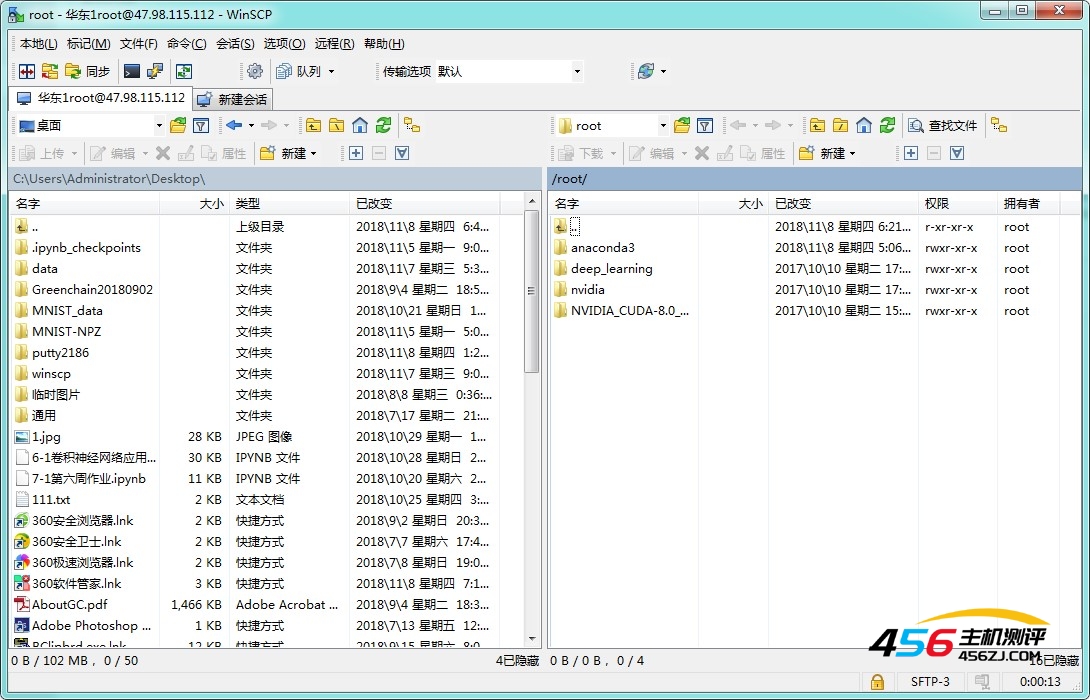
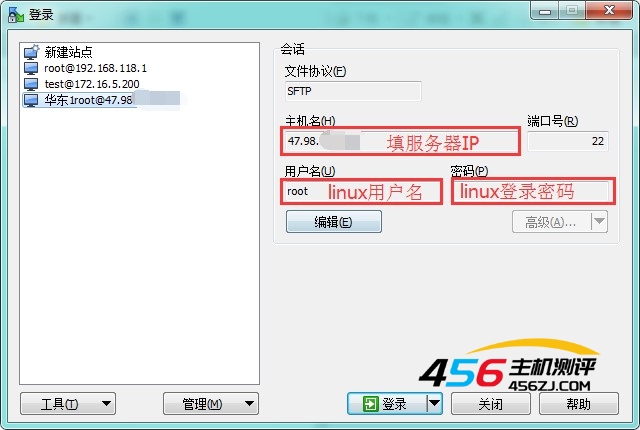
(2)、Winscp工具传输文件

传文件,传模型都可以
阿里云GPU服务器配置深度学习环境-远程访问-centos,cuda,cudnn,tensorflow,keras,jupyter notebook

阿里云GPU服务器配置深度学习环境-远程访问-centos,cuda,cudnn,tensorflow,keras,jupyter notebook


二、Linux相关配置:

1、管理员账户添加

添加用户

useradd run

设置密码

passwd run 

设置用户权限

usermod -g root run 

查看所有用户信息

cat /etc/passwd 

重置配置文件,需要root权限才能覆盖,所以丢失该文件之后要第一时间保证root的登录状态,重启就麻烦了(要么重装系统,要么在机箱上装系统盘进行恢复)

cp /etc/passwd- /etc/passwd

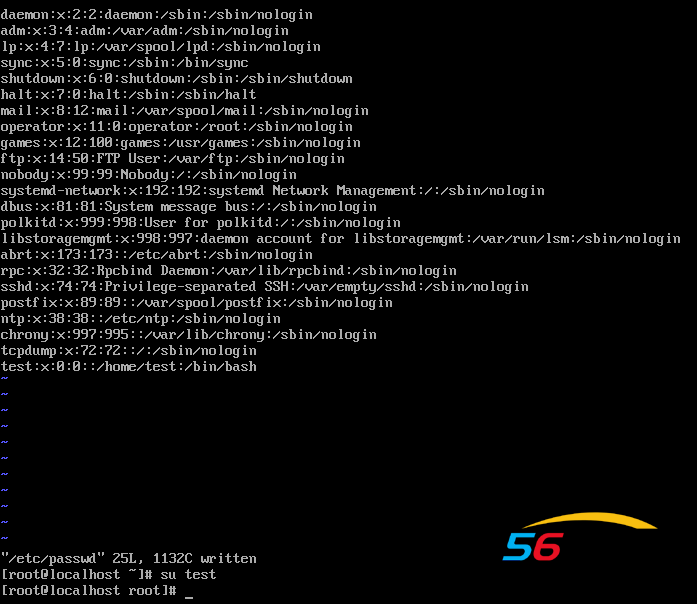
在root下编辑passwd

vi /etc/passwd 

如果我新添加的用户名是test那么:

第三个参数设为0即可

test:x:0:0::/home/test:/bin/bash 

光标移动到响应位置后按insert键进行修改。

修改完成后按ESC,输入“:wq”保存即可退出
 阿里云GPU服务器配置深度学习环境-远程访问-centos,cuda,cudnn,tensorflow,keras,jupyter notebook


#切换用户,切换到run用户 

su run 

命令行之前是#就说明是root权限


更改目录权限

sudo chmod -R 777 /home/run/


2、conda环境配置

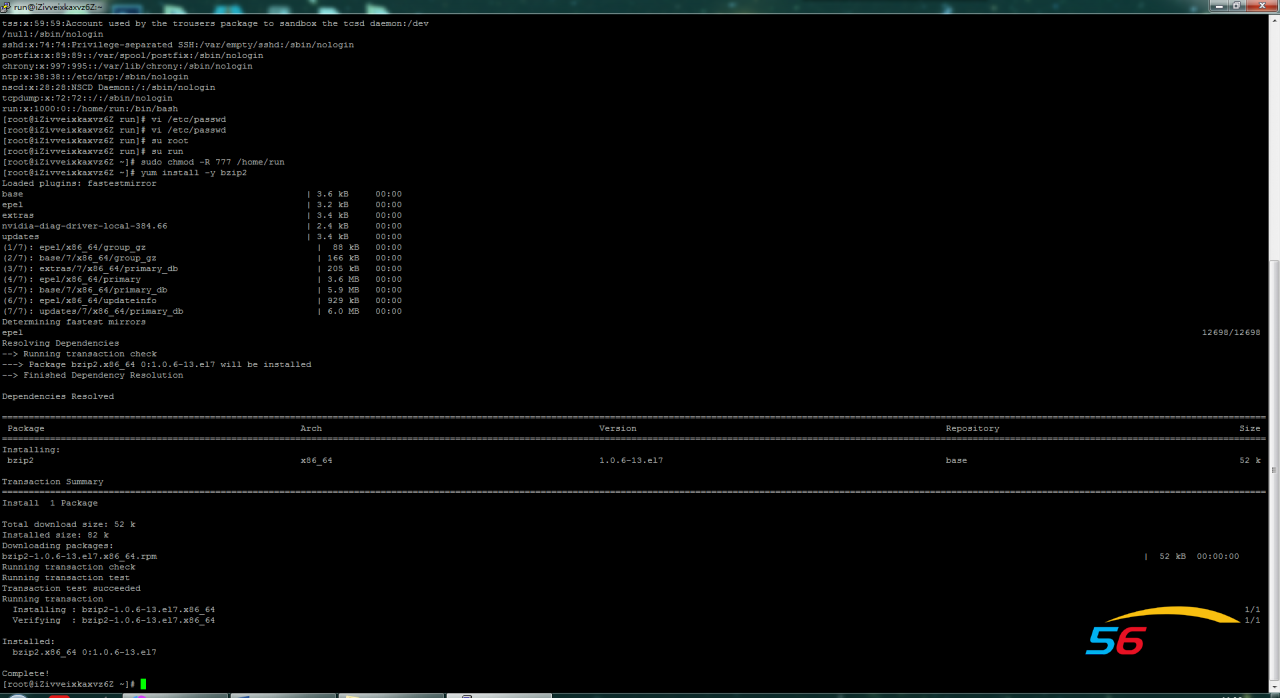
(1)安装bzip2

yum install -y bzip2
 阿里云GPU服务器配置深度学习环境-远程访问-centos,cuda,cudnn,tensorflow,keras,jupyter notebook


(2)、安装anaconda

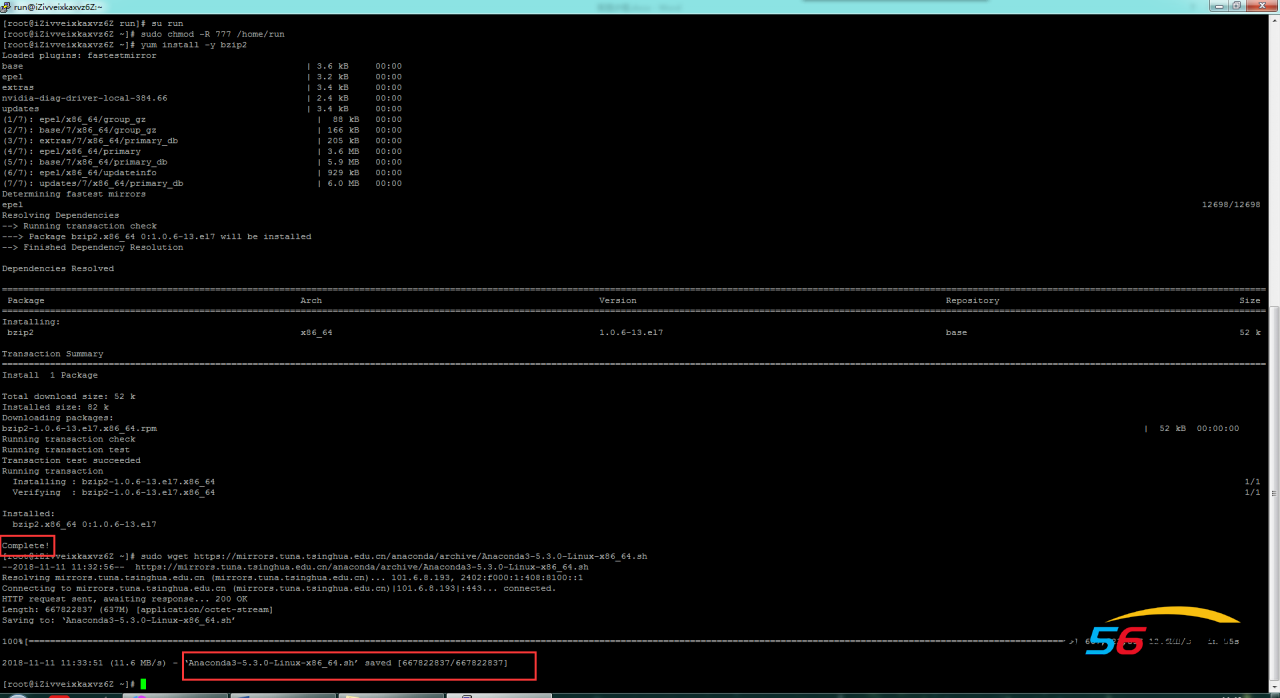
1)、下载

sudo wget https://mirrors.tuna.tsinghua.edu.cn/anaconda/archive/Anaconda3-5.3.0-Linux-x86_64.sh
阿里云GPU服务器配置深度学习环境-远程访问-centos,cuda,cudnn,tensorflow,keras,jupyter notebook


2)、安装

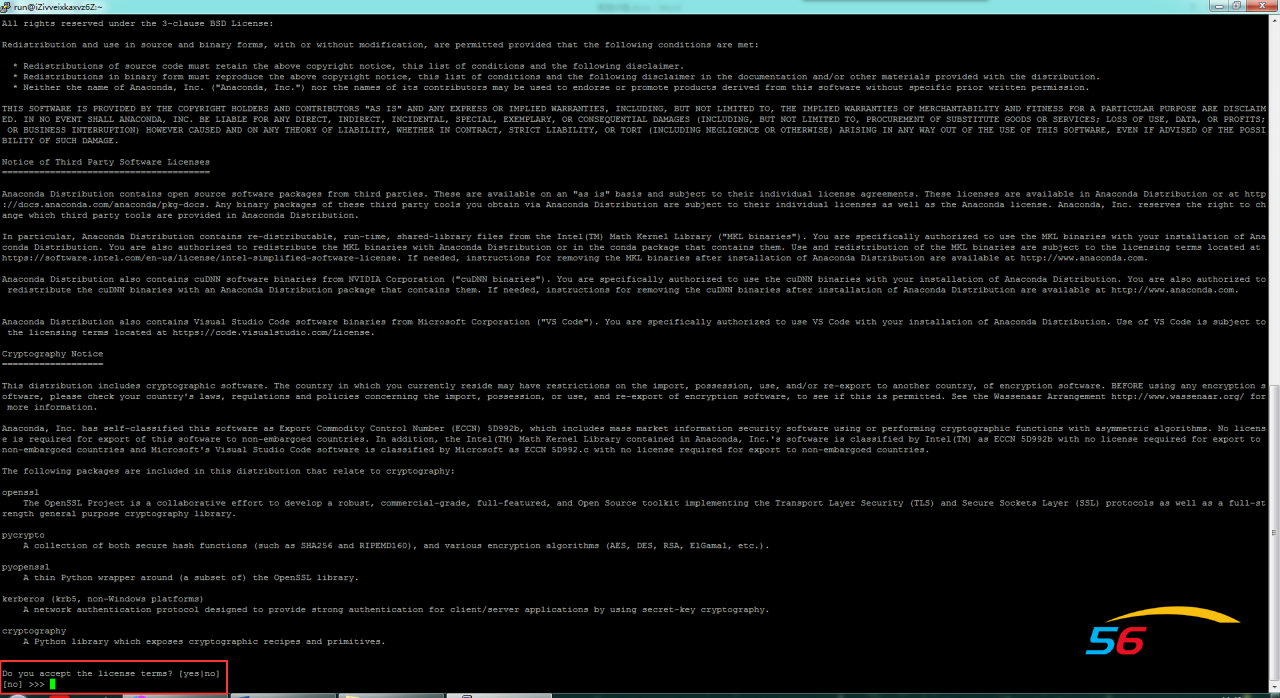
sudo bash Anaconda3-5.3.0-Linux-x86_64.sh

回车

阿里云GPU服务器配置深度学习环境-远程访问-centos,cuda,cudnn,tensorflow,keras,jupyter notebook

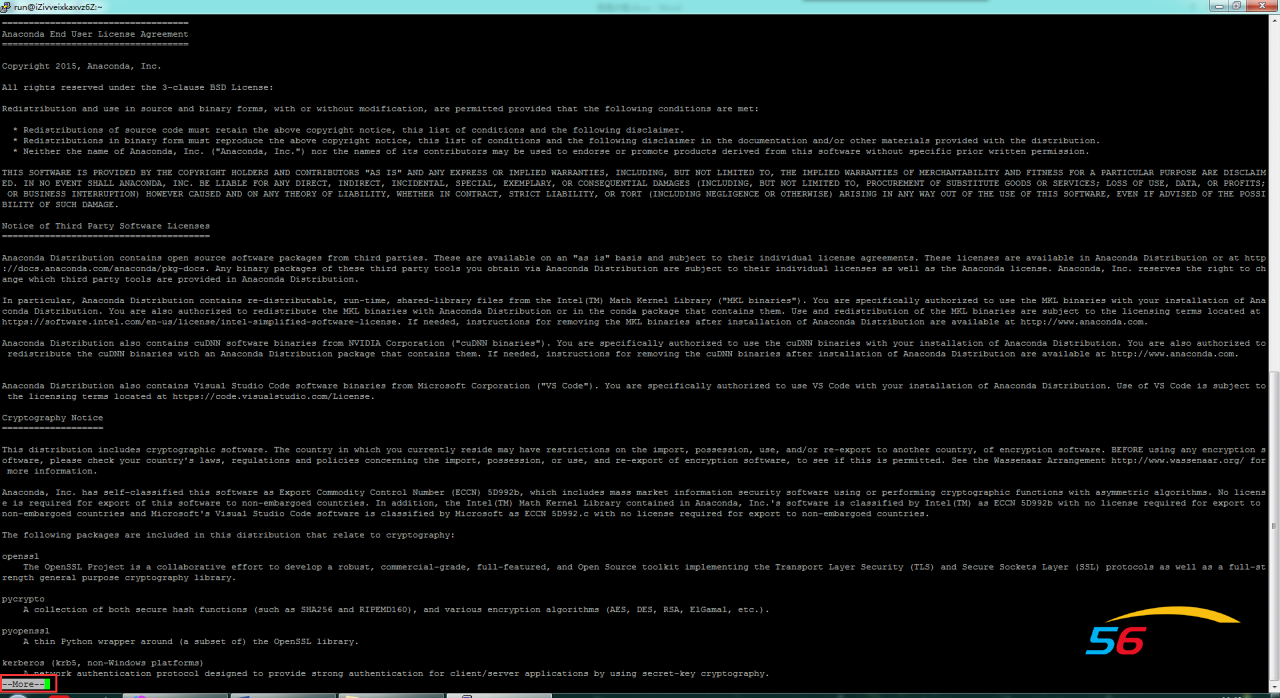
空格

阿里云GPU服务器配置深度学习环境-远程访问-centos,cuda,cudnn,tensorflow,keras,jupyter notebook


Yes

阿里云GPU服务器配置深度学习环境-远程访问-centos,cuda,cudnn,tensorflow,keras,jupyter notebook


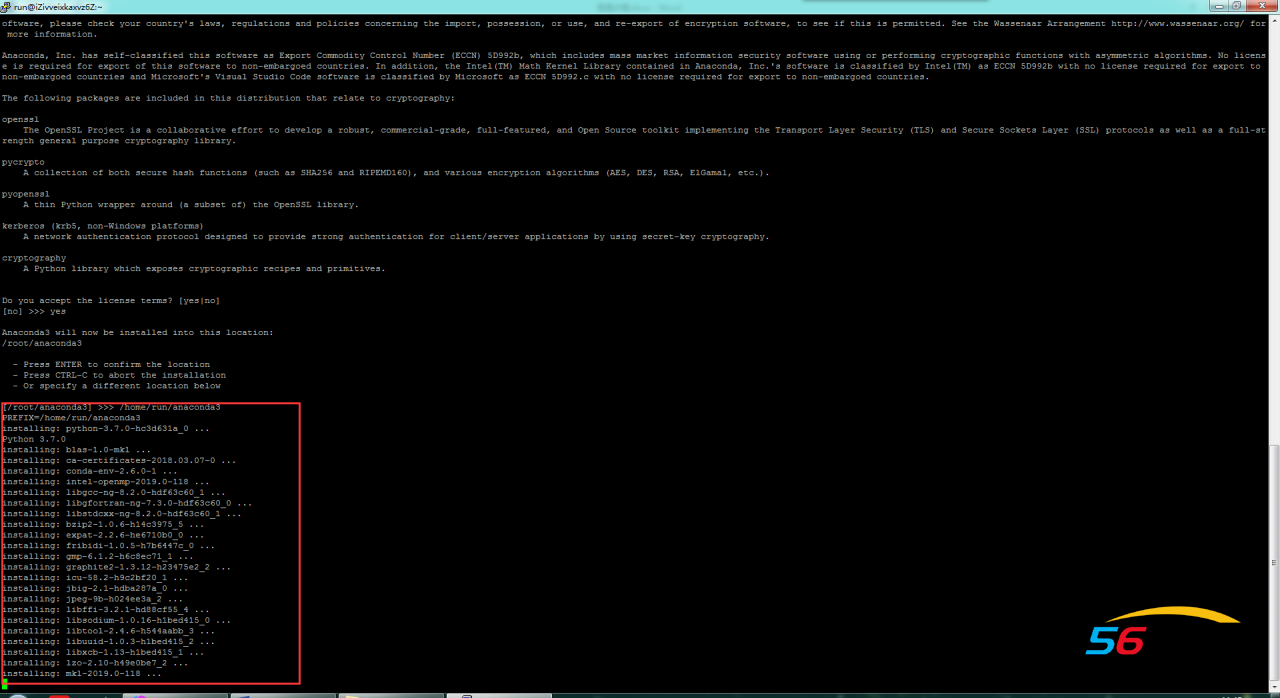
目录就写:

/home/run/anaconda3

阿里云GPU服务器配置深度学习环境-远程访问-centos,cuda,cudnn,tensorflow,keras,jupyter notebook

安装中。。。。。。

阿里云GPU服务器配置深度学习环境-远程访问-centos,cuda,cudnn,tensorflow,keras,jupyter notebook


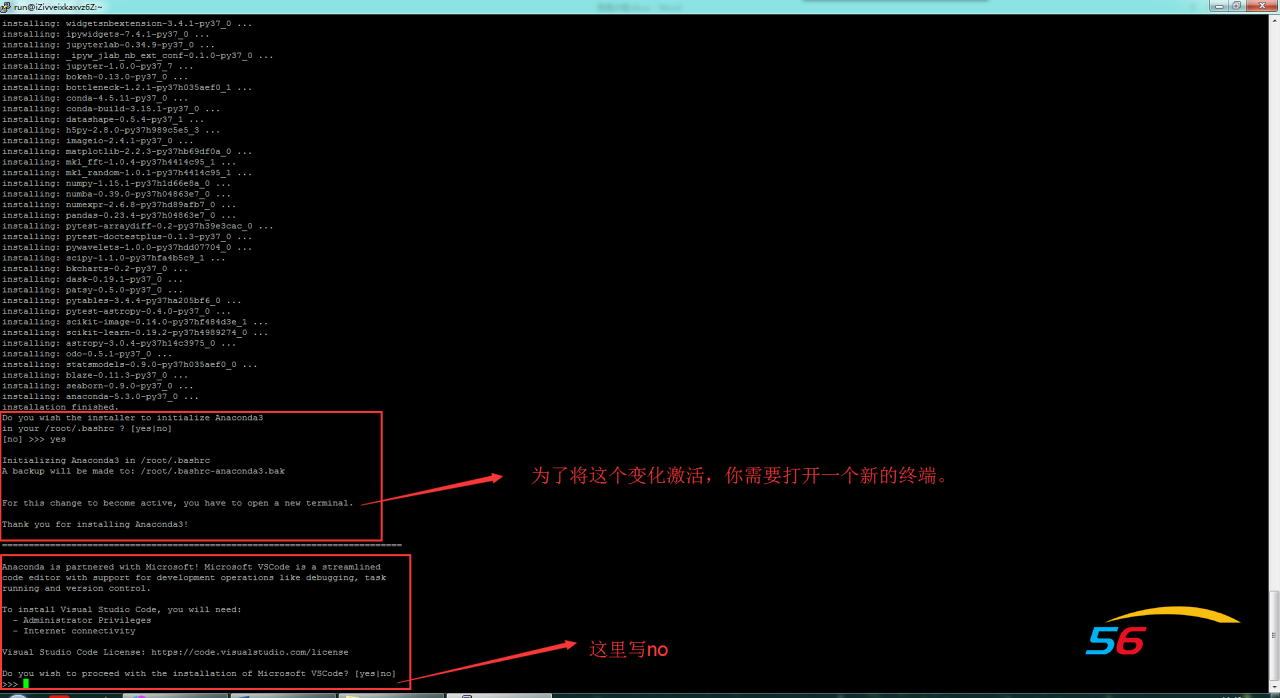
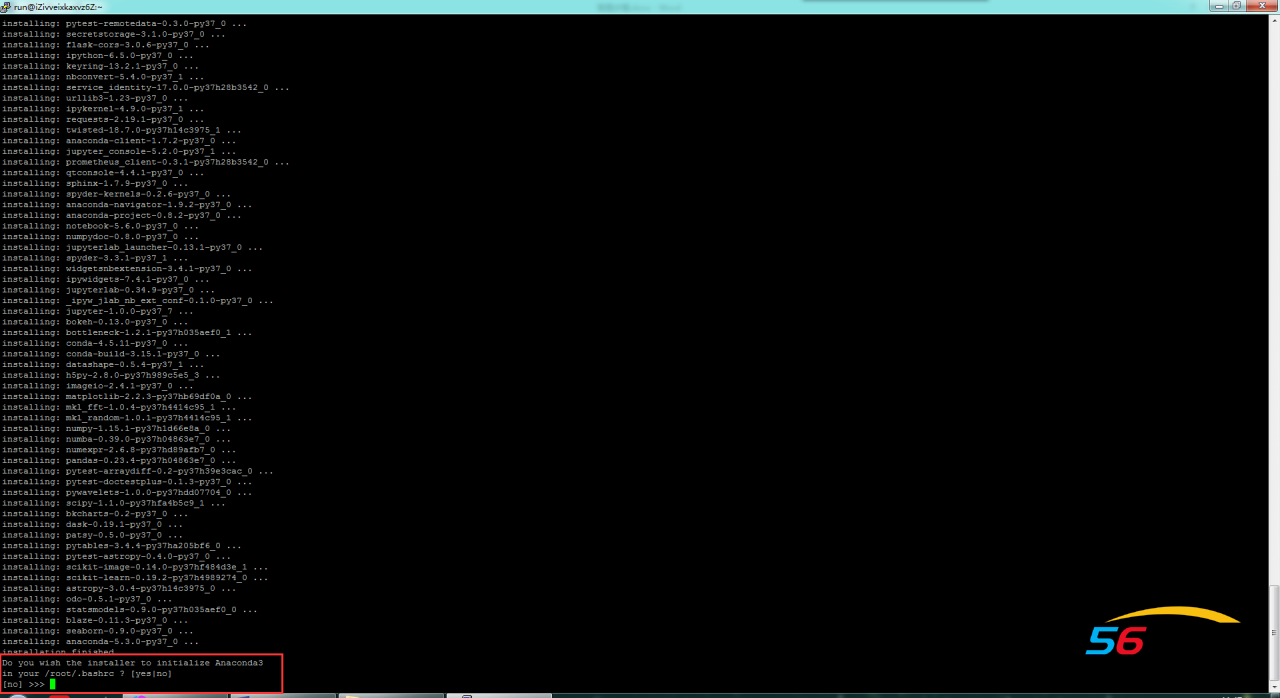
如果出现这句话:

一定要打yes,意思是是否愿意将conda添加到环境变量,实测这里打yes没卵用
阿里云GPU服务器配置深度学习环境-远程访问-centos,cuda,cudnn,tensorflow,keras,jupyter notebook

阿里云GPU服务器配置深度学习环境-远程访问-centos,cuda,cudnn,tensorflow,keras,jupyter notebook


(3)、conda环境变量配置:

如果没有出现是否愿意将conda添加到环境变量这句话,

就按照下面的步骤操作(出现了打yes也要按照这个来,因为打yes没卵用)

添加anaconda环境变量 
输入命令:

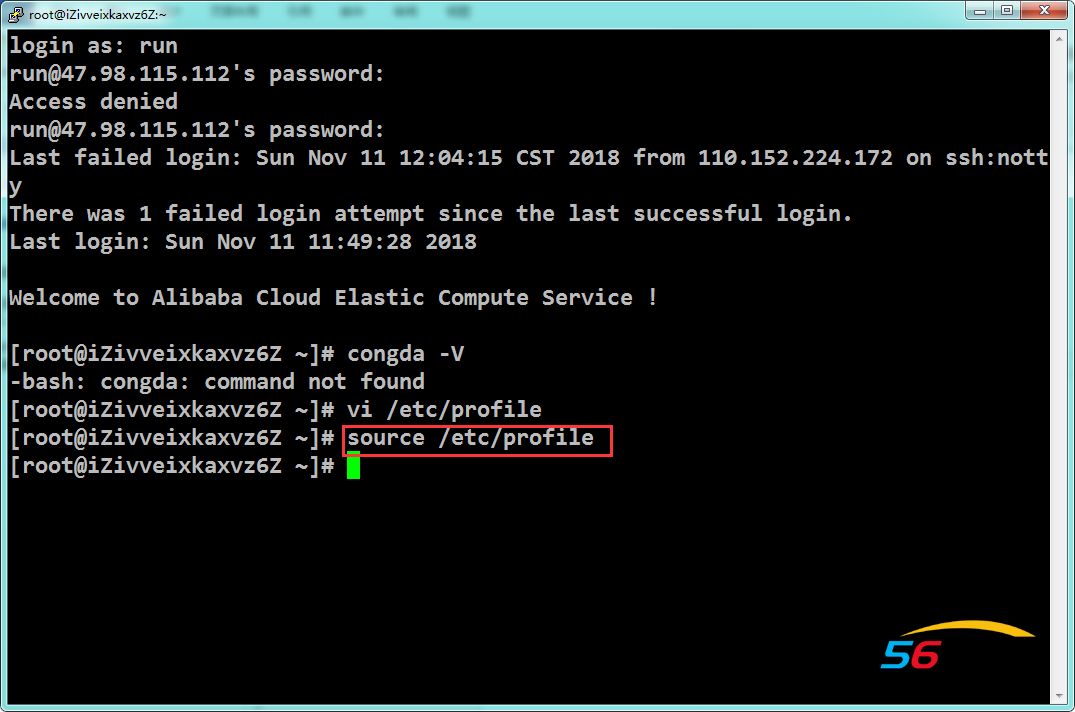
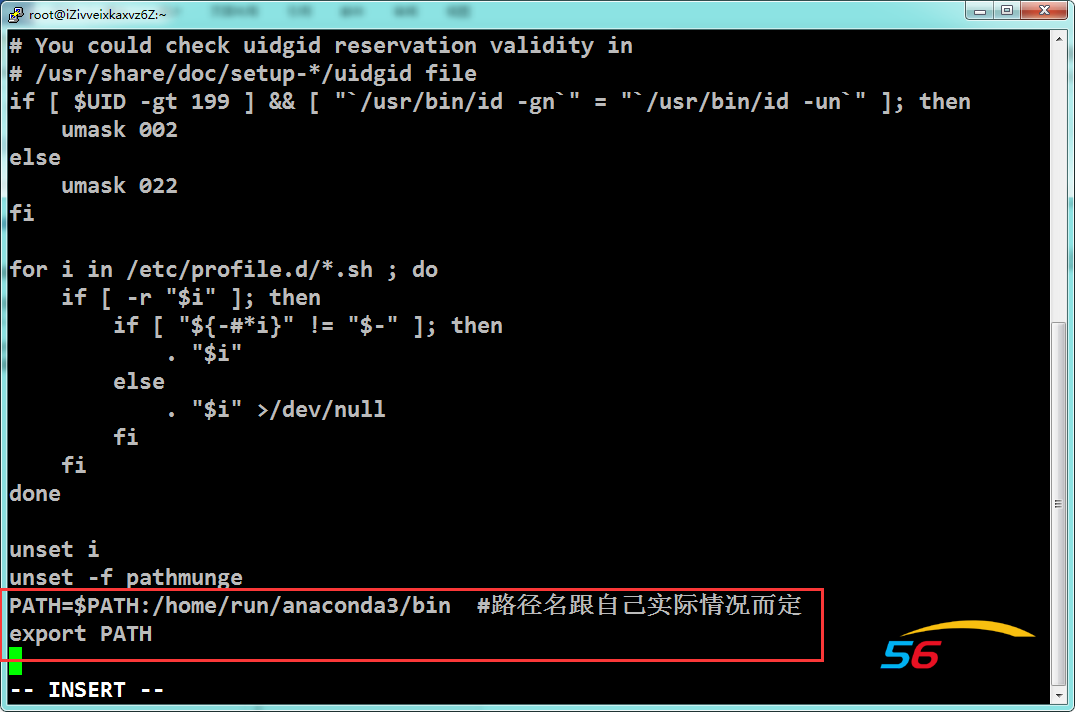
vi /etc/profile 

进入 /etc/profile 文件,在文件末尾加上如下两行代码


PATH=$PATH:/home/run/anaconda3/bin  #路径名跟自己实际情况而定

export PATH
 

阿里云GPU服务器配置深度学习环境-远程访问-centos,cuda,cudnn,tensorflow,keras,jupyter notebook

ESC,:wq保存

 使配置生效

source /etc/profile

阿里云GPU服务器配置深度学习环境-远程访问-centos,cuda,cudnn,tensorflow,keras,jupyter notebook


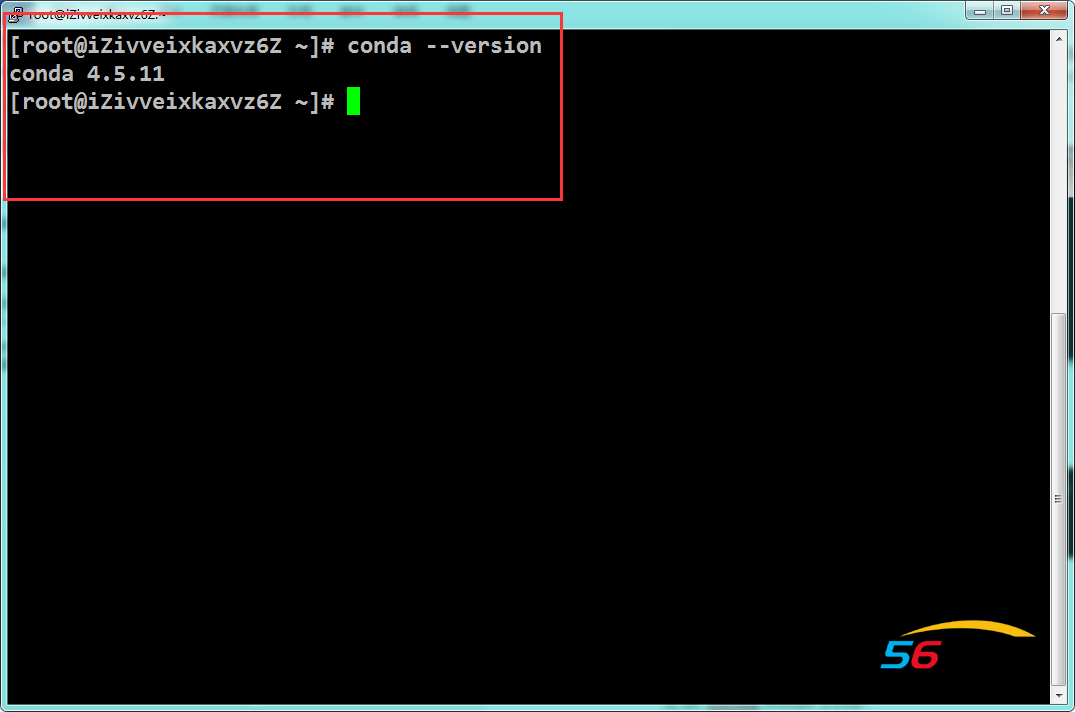
conda --version

这里看到显示版本则说明配置成功

阿里云GPU服务器配置深度学习环境-远程访问-centos,cuda,cudnn,tensorflow,keras,jupyter notebook


(4)conda更新

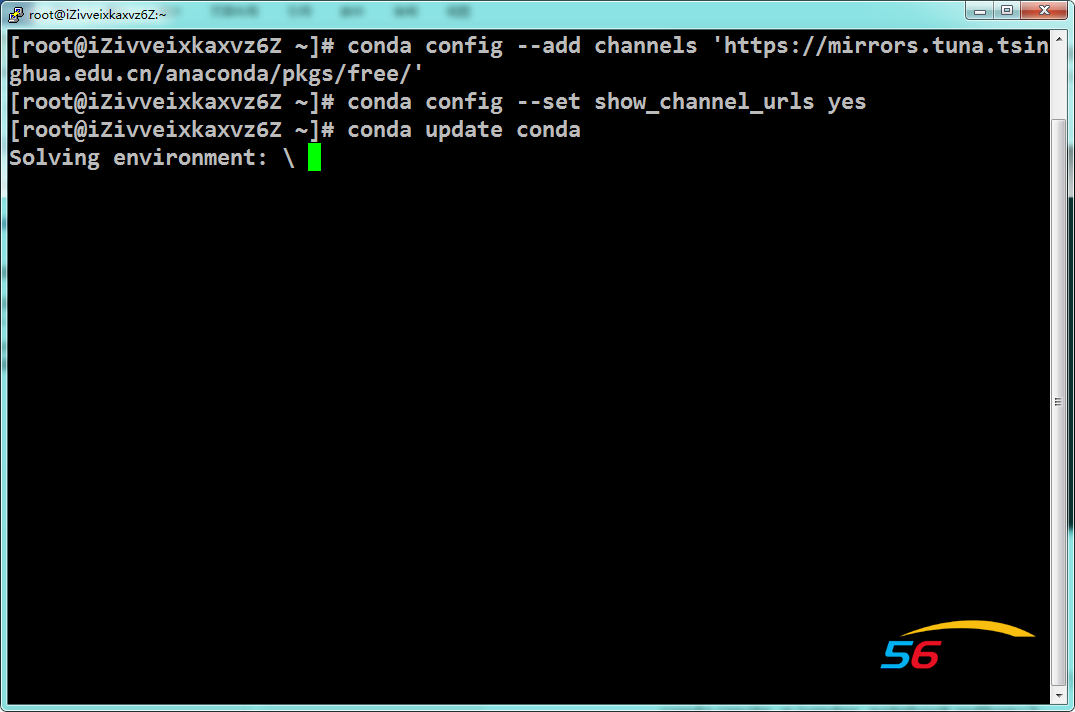
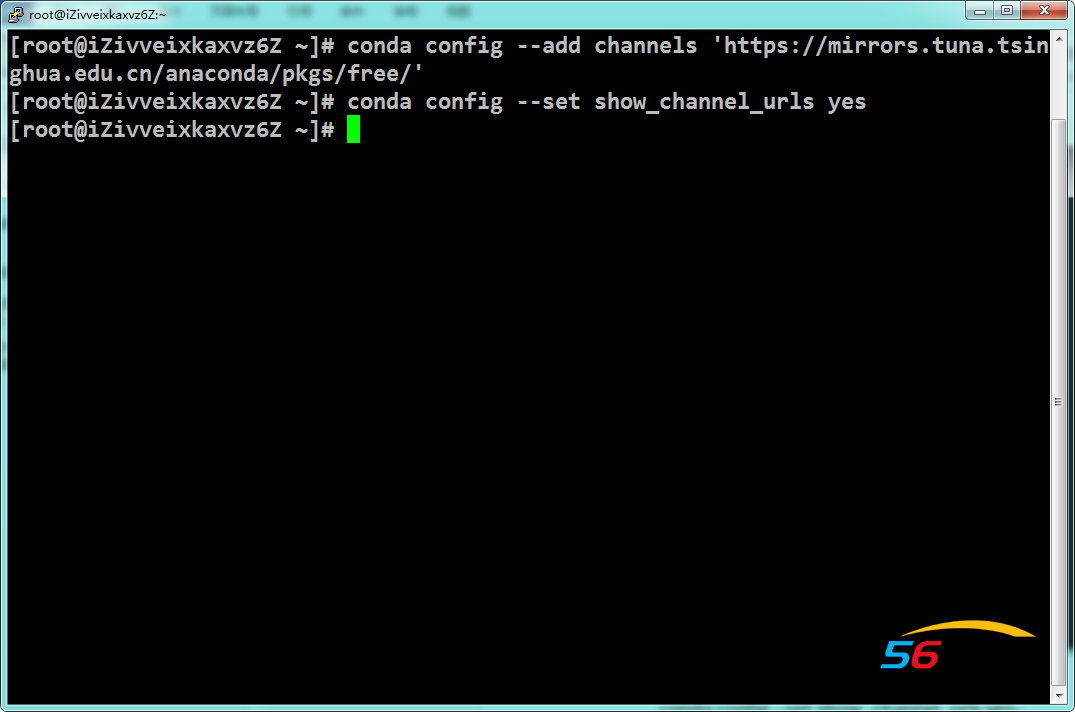
更新conda install的源,清华源

conda config --add channels 'https://mirrors.tuna.tsinghua.edu.cn/anaconda/pkgs/free/'


设置搜索时显示通道地址

conda config --set show_channel_urls yes
阿里云GPU服务器配置深度学习环境-远程访问-centos,cuda,cudnn,tensorflow,keras,jupyter notebook


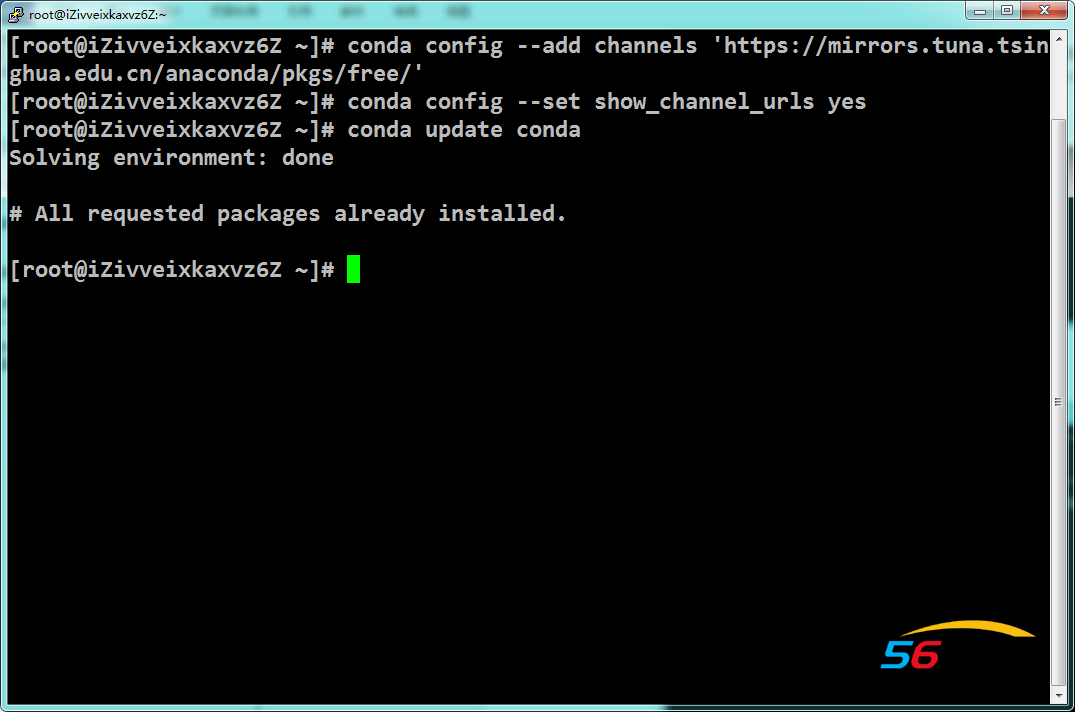
更新一下conda

conda update conda

阿里云GPU服务器配置深度学习环境-远程访问-centos,cuda,cudnn,tensorflow,keras,jupyter notebook

阿里云GPU服务器配置深度学习环境-远程访问-centos,cuda,cudnn,tensorflow,keras,jupyter notebook


3、jupyter notebook环境配置:

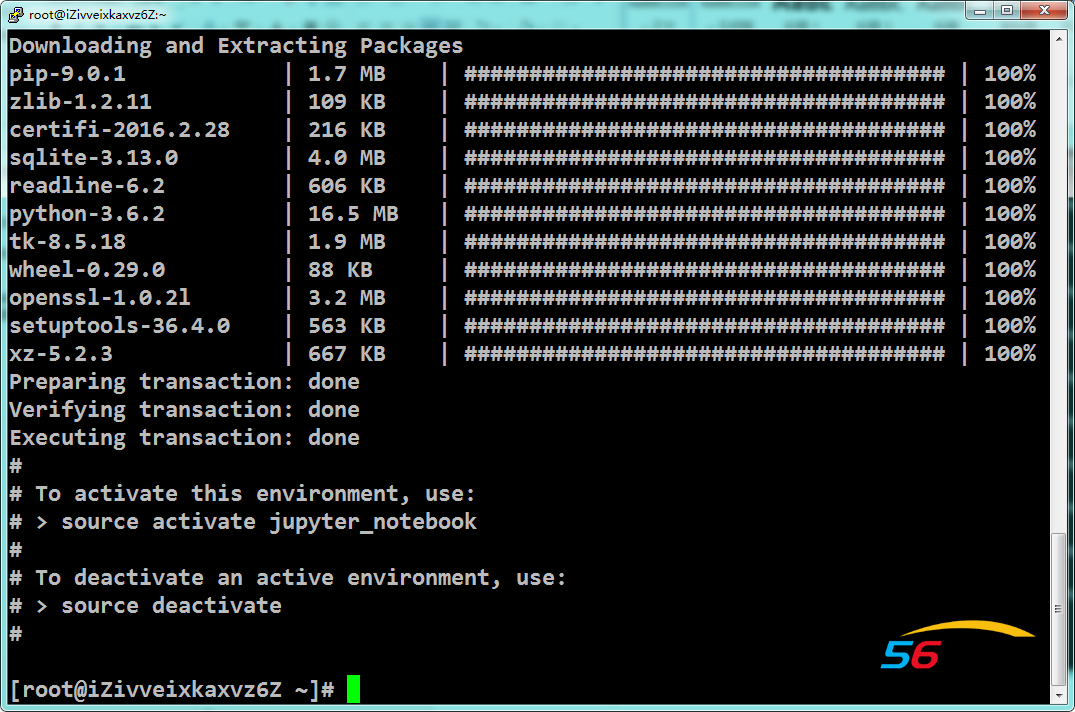
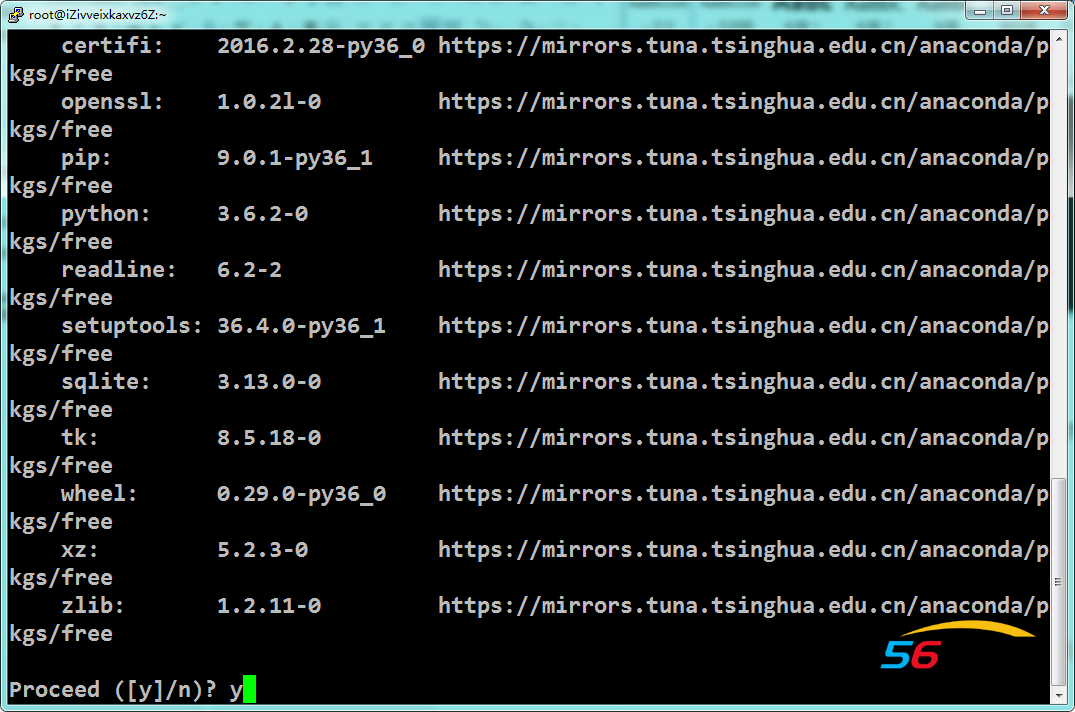
(1)、创建jupyter notebook运行环境,

可以方便管理各类库

conda create -n jupyter_notebook python=3
阿里云GPU服务器配置深度学习环境-远程访问-centos,cuda,cudnn,tensorflow,keras,jupyter notebook

阿里云GPU服务器配置深度学习环境-远程访问-centos,cuda,cudnn,tensorflow,keras,jupyter notebook


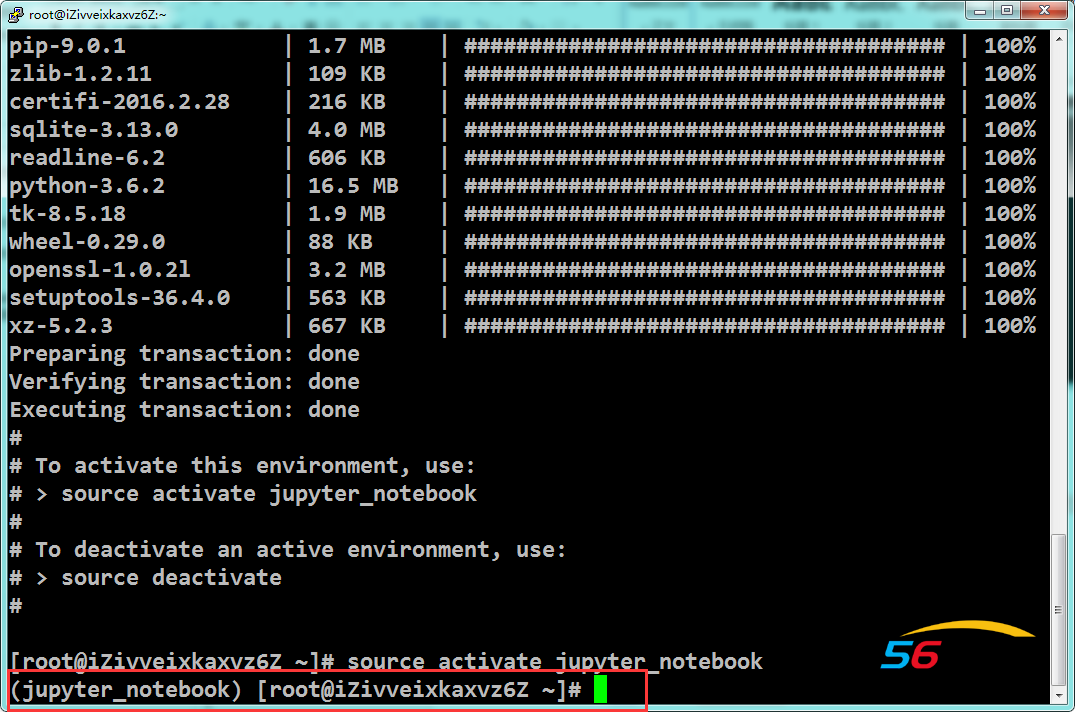
激活环境

source activate jupyter_notebook

现在是在jupyter的环境下:
阿里云GPU服务器配置深度学习环境-远程访问-centos,cuda,cudnn,tensorflow,keras,jupyter notebook


退出环境:后续所有操作都是在jupyter环境中运行,所以不要退出

source deactivate


(2)、安装深度学习所需要的所有库

有conda install尽量用conda install

如果没有就用pip install

为什么,因为conda install快啊。

pip install --upgrade pip

conda install numpy

conda install pandas

conda install tensorflow-gpu

conda install keras

pip install jieba


(3)、安装jupyter notebook

conda install jupyter notebook


测试

jupyter notebook --ip=127.0.0.1 --allow-root

阿里云GPU服务器配置深度学习环境-远程访问-centos,cuda,cudnn,tensorflow,keras,jupyter notebook

Ctrl+c退出


(4)、配置jupyter notebook远程访问

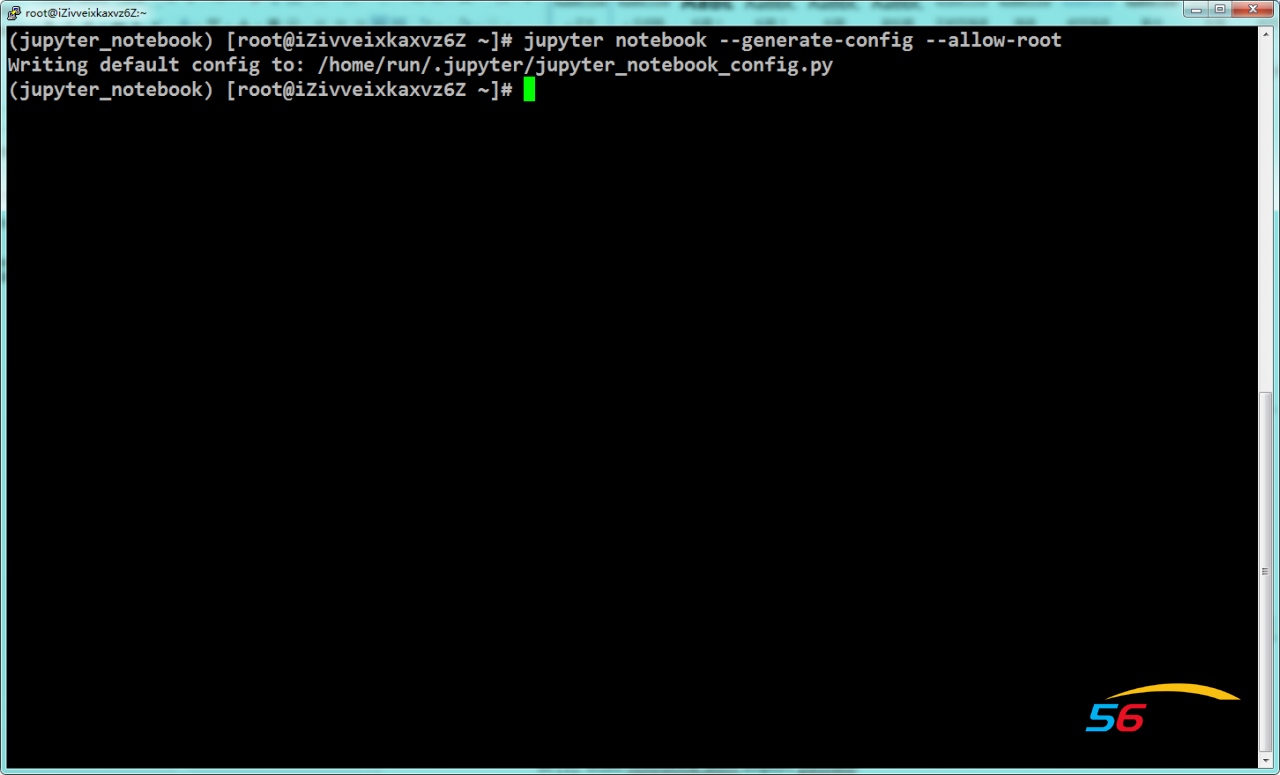
jupyter notebook --generate-config --allow-root

生成了一个.py的配置文件
阿里云GPU服务器配置深度学习环境-远程访问-centos,cuda,cudnn,tensorflow,keras,jupyter notebook


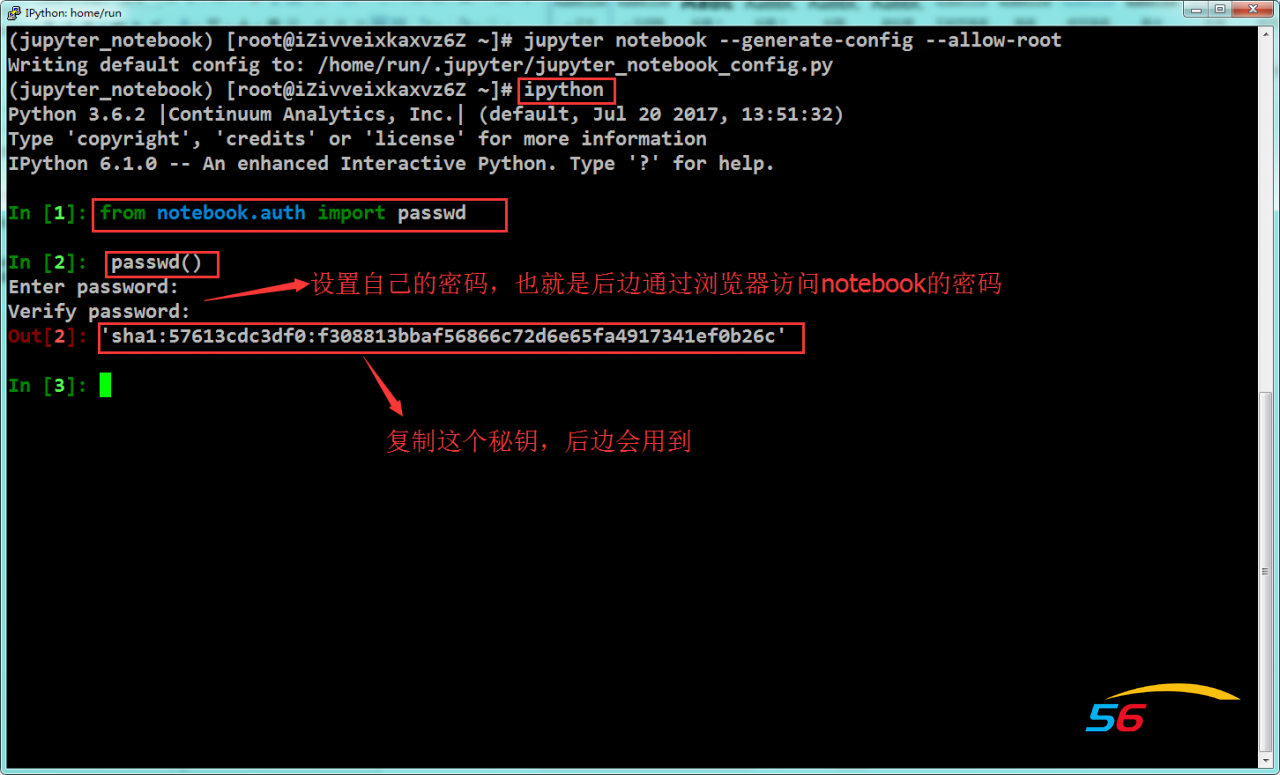
生成密码:

ipython

 In [1],In [2]分别是:

from notebook.auth import passwd passwd() 

Enter password: 自己输入,记住,等会远程登录使用

Verify password:

Out[2]: 'sha1:f7a4725c96ae:6f4b9089e295405d0e4a2fdfc3d2209f9dd0214f'

保存好这个out的密码
阿里云GPU服务器配置深度学习环境-远程访问-centos,cuda,cudnn,tensorflow,keras,jupyter notebook

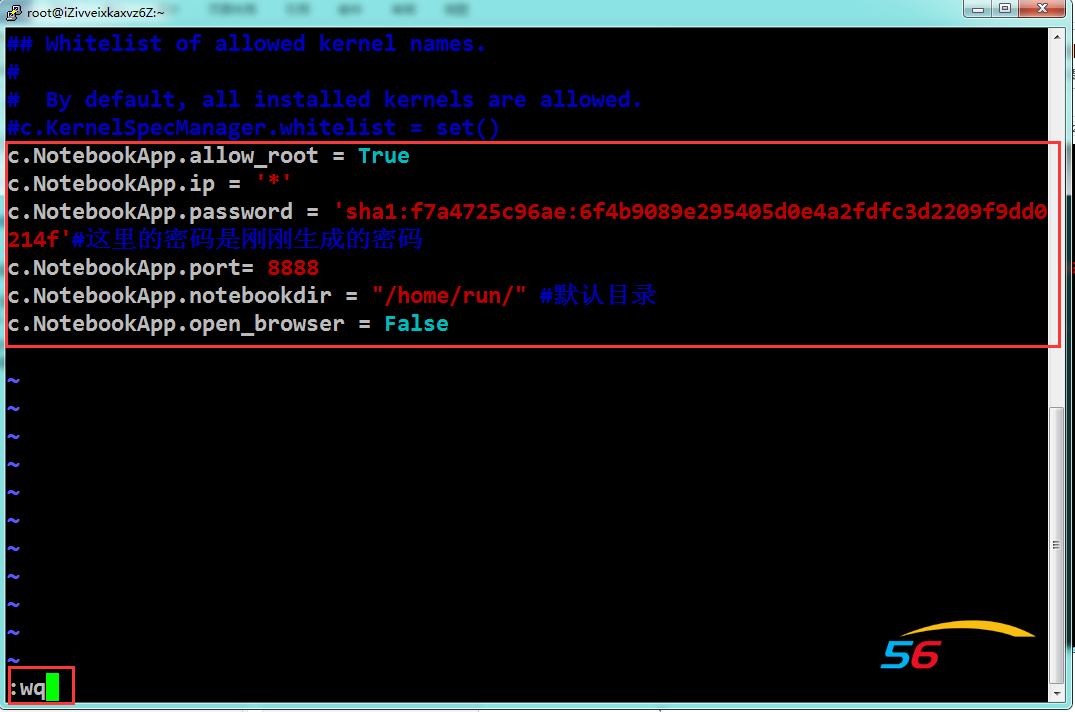
现在打开.py的配置文件:

vim /home/run/.jupyter/jupyter_notebook_config.py

在最后一行加入:

c.NotebookApp.allow_root = True

c.NotebookApp.ip = '*'

c.NotebookApp.password = 'sha1:f7a4725c96ae:6f4b9089e295405d0e4a2fdfc3d2209f9dd0214f'#这里的密码是刚刚生成的密码

c.NotebookApp.port= 8888

c.NotebookApp.notebook_dir = "/home/run/" #默认目录

c.NotebookApp.open_browser = False


在按ESC,输入::wq保存退出
阿里云GPU服务器配置深度学习环境-远程访问-centos,cuda,cudnn,tensorflow,keras,jupyter notebook


(5)、运行jupyter

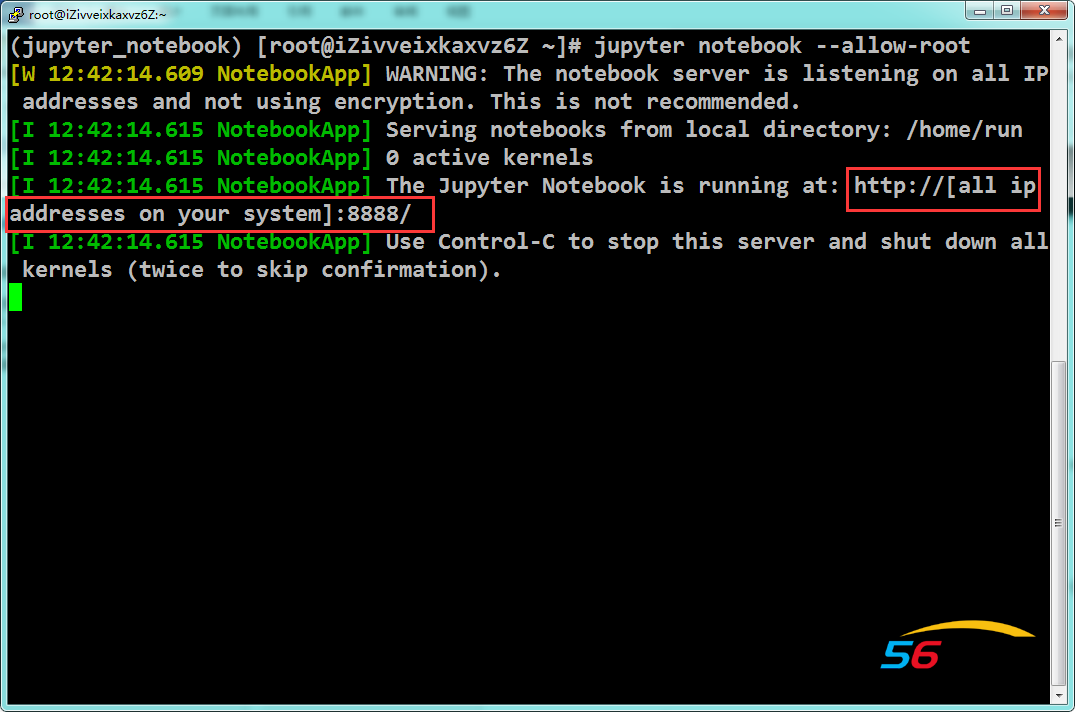
jupyter notebook --allow-root
阿里云GPU服务器配置深度学习环境-远程访问-centos,cuda,cudnn,tensorflow,keras,jupyter notebook


All ip 说明允许所有IP进行访问。


(6)、jupyter本地链接

现在打开浏览器:

输入服务器IP:8888进入

再输入前边passwd()后自己设置的密码:

阿里云GPU服务器配置深度学习环境-远程访问-centos,cuda,cudnn,tensorflow,keras,jupyter notebook

所有的操作就和本地的jupyter notebook是一样的了

阿里云GPU服务器配置深度学习环境-远程访问-centos,cuda,cudnn,tensorflow,keras,jupyter notebook

阿里云GPU服务器配置深度学习环境-远程访问-centos,cuda,cudnn,tensorflow,keras,jupyter notebook

这就是环境配置完成了。


三、跑代码

别忘了保存模型文件

本地编辑好代码之后,直接粘贴在阿里云的notebook里,时间就是金钱啊,要珍惜每一秒钟。


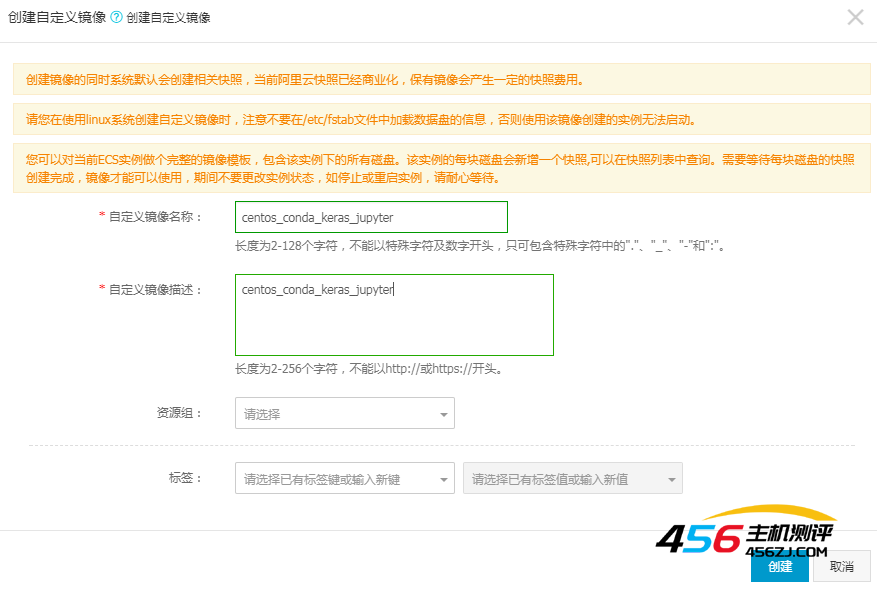
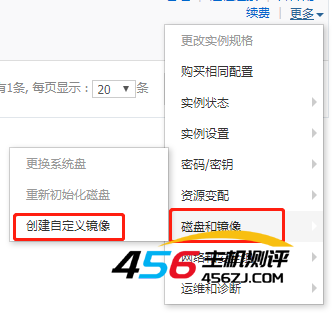
四、创建自定义镜像
 阿里云GPU服务器配置深度学习环境-远程访问-centos,cuda,cudnn,tensorflow,keras,jupyter notebook


阿里云GPU服务器配置深度学习环境-远程访问-centos,cuda,cudnn,tensorflow,keras,jupyter notebook

创建好之后每次购买阿里云GPU(按量付费)的话,就不用每次都配置了,镜像文件选择自定义镜像就可以了。


五、释放实例

跑完代码之后,模型文件保存到本地之后,到阿里云的控制台,选择左侧实例,找到GPU服务器,右侧找到更多释放实例→立即释放


六、再次启动

再次使用实例的时候,那些繁杂的安装就不需要了,前面的自定义镜像就相当于GHOST一个镜像,进行系统还原一样。

只需要:

1,启动激活notebook环境,

source activate jupyter_notebook

2,运行jupyter notebook

jupyter notebook --allow-root

3,启动浏览器,新GPU服务IP:8888进入。

4,Putty+winscp链接新服务器。

就可以了。

  • 海报
海报图正在生成中...
赞(0) 打赏
声明:
1、本博客不从事任何主机及服务器租赁业务,不参与任何交易,也绝非中介。博客内容仅记录博主个人感兴趣的服务器测评结果及一些服务器相关的优惠活动,信息均摘自网络或来自服务商主动提供;所以对本博客提及的内容不作直接、间接、法定、约定的保证,博客内容也不具备任何参考价值及引导作用,访问者需自行甄别。
2、访问本博客请务必遵守有关互联网的相关法律、规定与规则;不能利用本博客所提及的内容从事任何违法、违规操作;否则造成的一切后果由访问者自行承担。
3、未成年人及不能独立承担法律责任的个人及群体请勿访问本博客。
4、一旦您访问本博客,即表示您已经知晓并接受了以上声明通告。
文章名称:《阿里云GPU服务器配置深度学习环境-远程访问-centos,cuda,cudnn,tensorflow,keras,jupyter notebook》
文章链接:https://www.456zj.com/5190.html
本站资源仅供个人学习交流,请于下载后24小时内删除,不允许用于商业用途,否则法律问题自行承担。

评论 抢沙发

  • 昵称 (必填)
  • 邮箱 (必填)
  • 网址